With Easter only a few days away, spring in the air and our little mama chicken sitting on eggs, today we made rice krispie bird's nests! Everyone loves rice krispie treats and they are even better in the shape of a nest!
Rice Krispie Bird's Nests
Indgredients:
1/4 cup butter
4 1/2 cups mini marshmallows
1 tsp. vanilla extract
5 cups Rice Krispie cereal
Cooking spray
Preparation:
1. Add the butter to a large pan and melt slowly.
2. Once the butter is melted, add the mini marshmallows and stir occasionally until all marshmallows are melted.
3. Add the vanilla extract and stir thoroughly into the marshmallow butter mixture.
4. Stir in the cereal and stir to combine.
5. Spray a muffin pan with cooking spray.
6. Press 1/4 cup of the Krispie mixture into each muffin and use a spoon to to put an indent into the top of each nest.
7. Add eggs or marshmallow peeps to finish off your nest.
Enjoy!
Tuesday, April 15, 2014
Eggcellent day
Since we have been spending so much time checking on our little mama chicken sitting on her eggs, I decided we should do some activities today involving nests and eggs.
Building number sense with eggs:
" Batman" and I have been working on one to one correspondence with his counting as well as number recognition. I found some great bird's nests on clearance at AC Moore and picked them up because they were just too good to pass up! I set up the bird's nests with numbers next to each nest and a bowl of mini robin's eggs to sort.
After "Batman" did his counting in order, I switched all the numbers so he wasn't able to just count them off in order. We also practiced adding and taking away eggs and discussing the new number. He had a great time and of course it didn't hurt that I let him sneak a few eggs. I love this activity because it can be adapted for any age level. Little ones can practice their fine motor skills by simply putting the eggs in the nest and older kids can count by 2's, add, subtract, multiply, the possibilities are endless!
Happy egg counting!
Building number sense with eggs:
" Batman" and I have been working on one to one correspondence with his counting as well as number recognition. I found some great bird's nests on clearance at AC Moore and picked them up because they were just too good to pass up! I set up the bird's nests with numbers next to each nest and a bowl of mini robin's eggs to sort.
![]() |
| "Batman" counting out his eggs |
After "Batman" did his counting in order, I switched all the numbers so he wasn't able to just count them off in order. We also practiced adding and taking away eggs and discussing the new number. He had a great time and of course it didn't hurt that I let him sneak a few eggs. I love this activity because it can be adapted for any age level. Little ones can practice their fine motor skills by simply putting the eggs in the nest and older kids can count by 2's, add, subtract, multiply, the possibilities are endless!
Happy egg counting!
Monday, April 14, 2014
We're expecting... chicks!
We are about to hatch our first chicks here at Yankee Belle Farm. Up until this point I have gotten our chicks from local feed stores and hatcheries. I had planned on incubating some eggs this spring but when my little silkie started sitting on her eggs I decided that I would let the chicks hatch the natural way. Gandalf The White is already such a good little mama. She sits on her eggs diligently only getting up to eat and drink. Stay tuned for the details on this first hatch.
Bruschetta Quiche
With a surplus of eggs I am always looking for new recipes with eggs at the center. I found this incredible recipe at a great blog called Tilly's Nest. I have never actually made a quiche before and this one was so simple and flavorful. My little chef even had a great time helping make this. Pair it with a side salad and you have a fantastic meal!
For the original recipe, go to http://www.tillysnest.com/2014/03/bruschetta-quiche.html.
Bruschetta Quiche from Tilly's Nest
Ingredients:
6 Eggs
3/4 cup of milk
1 cup feta cheese with herbs
2 tablespoons of brown mustard
1 cup cherry tomatoes-quartered
2 tablespoons fresh chopped basil
2 tablespoons olive oil
1 tablespoon balsamic vinegar
1 pie crust
Salt and Pepper
Preparation:
Preheat the oven to 350 degrees F.
Spread out the pie crust in the baking dish. Now spread the mustard (secret ingredient) on top of the pie crust.
In a small bowl, mix together the quartered cherry tomatoes, fresh basil, olive oil, balsamic vinegar, and a bit of salt and pepper. Stir well and set it aside.
In a medium bowl, whisk together the eggs and milk. Next add the feta cheese and whisk that together. Pour the egg mixture into the dish with the pie crust.
Evenly add the tomato and basil bruschetta to the top of the egg mixture.
Bake in the oven for approximately 40 minutes, until the top is golden brown.
Sunday, April 13, 2014
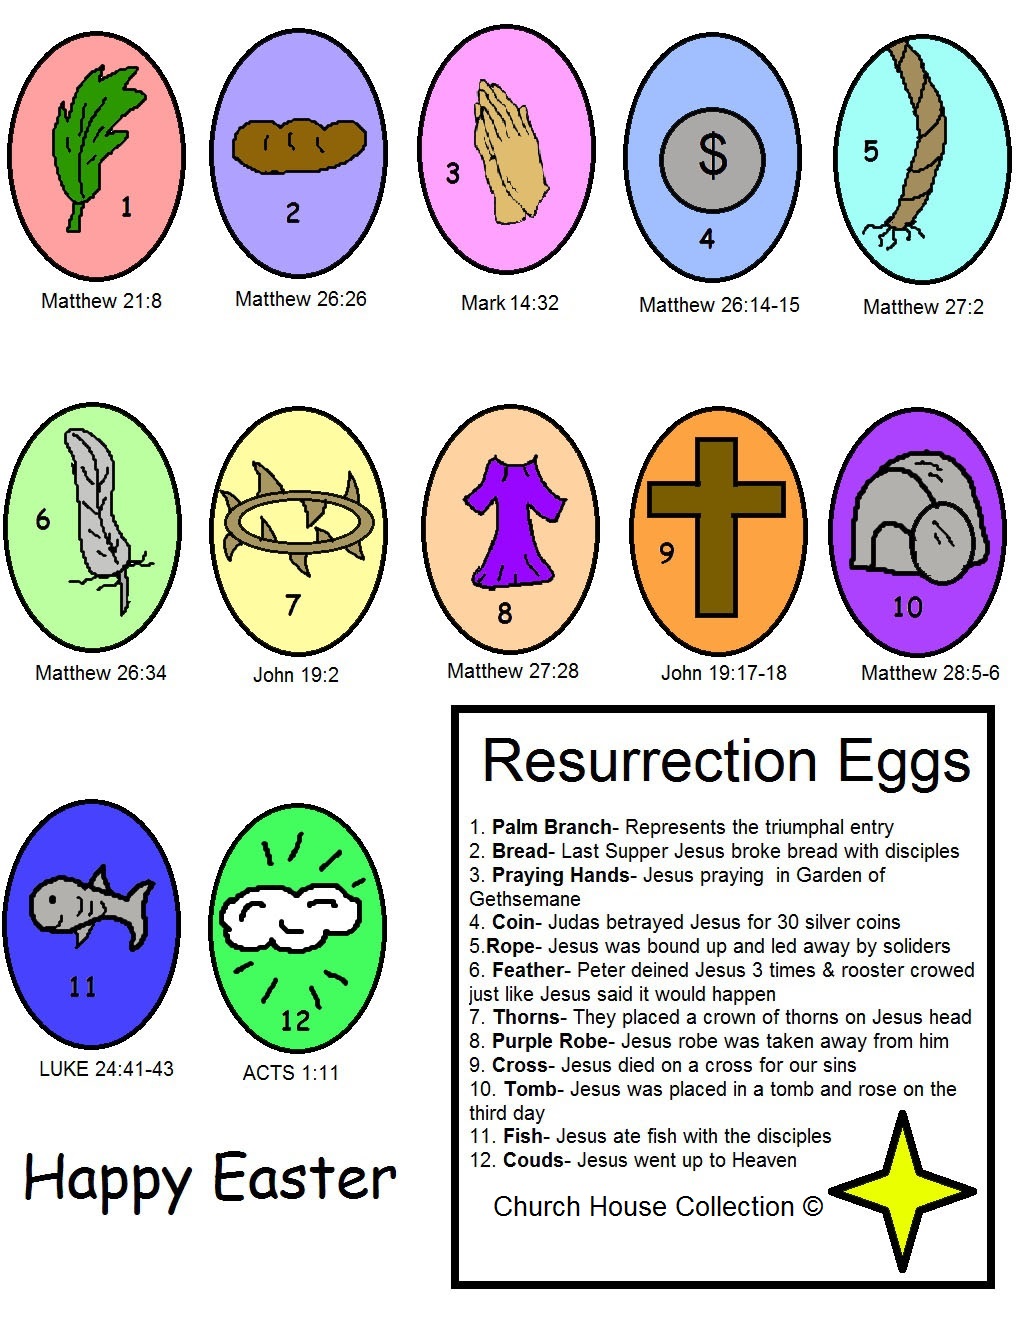
Resurrection Eggs
Easter is just around the corner and we LOVE holidays around here. As much as I love egg dying, bunny crafting and eating lots of marshmallow peeps, I wanted to think of something to do with the kids to keep Jesus at the center of our Easter celebration. After some thinking, talking and internet investigation I found resurrection eggs. I hadn't heard of these before even though I now know they have been around a long time. There are lots of versions out there including ones you can buy. I will share with you our version and how we explore the eggs.
Materials:
* 1 Egg cartion
* 12 plastic eggs
* Print out from church house clipart: http://www.churchhouseclipart.com/resources/Resurrection%20Eggs%20Colored%20Page.jpg
* Small palm branch
* Small piece of bread
* Silver coin
* Small piece of rope
* Feather
* Thorns
* Purple cloth
* Small cross
* Goldfish
* Cotton ball
I started by numbering my eggs 1-12. I used a great print out I found at Church House Clipart to guide what I was going to put in each egg. I cut out each little picture and put a corresponding item in each of the 12 eggs. There is also a verse that goes with each picture.
I thought it would be fun to have the kids hunt for these each morning when they get up, one per day until Easter. They hunt around until they each find their special egg for the day. We spend time talking about what is in the egg and reading a bible story from their children's bible. It is a really great way to start the day and a great way to get kids talking and thinking about Jesus at Easter.
Materials:
* 1 Egg cartion
* 12 plastic eggs
* Print out from church house clipart: http://www.churchhouseclipart.com/resources/Resurrection%20Eggs%20Colored%20Page.jpg
* Small palm branch
* Small piece of bread
* Silver coin
* Small piece of rope
* Feather
* Thorns
* Purple cloth
* Small cross
* Goldfish
* Cotton ball
I started by numbering my eggs 1-12. I used a great print out I found at Church House Clipart to guide what I was going to put in each egg. I cut out each little picture and put a corresponding item in each of the 12 eggs. There is also a verse that goes with each picture.
![]() | |||||||||
| The first 6 eggs open with their tangible items |
![]() |
| "Batman" was pretty proud of himself when he found his first Resurrection Egg! |
![]() |
| "Strawberry Shortcake" grabbed her egg and ran! |
Saturday, April 12, 2014
For the shear fun of it
We are about to add alpacas to our mini farm and I am so ecstatic I could burst. We have been busy getting things ready around here like building a barn, putting up the fence and gathering the necessary supplies. One of the last preparations that needed to be done before our babies come to live with us was shearing. Ross and I had the privilege to go to Black Tulip Farm Alpacas to help and learn on shearing day. Let me tell you alpaca shearing is an experience and it was a great one! For starters the alpacas start out looking like fuzzy little teddy bears and come out looking so small and dainty.
Alpacas have to be shorn yearly in order to keep them cool. Their fiber keeps them extremely warm which becomes problematic when is gets hot outside. Once their fiber is removed it can be made into so many wonderful things! I can't wait to get the fiber from our alpacas spun into yarn. Joe and Austin, who were doing the shearing, were so incredibly gifted in what they were doing. They had shearing down to an exact science. We were so impressed with how in tune they were with the animals and how understanding they were with us, the beginners. We have gone through our first shearing season and we are super excited for our newly shorn alpacas to come live with us!
![]() |
| Alpacas, some have already experienced shearing and some have not. |
![]() | |||
| One of our little guys getting his spring hair cut. |
![]() |
| Fiber from our boys just waiting to be spun into yarn |
Wednesday, April 9, 2014
A Mini-Farm is Born
Let me start this post by saying that my little farm I have created is in by no means a working farm. I have great respect for the farmers that work so the rest of us can eat every day. That being said I thought it only appropriate to name our little piece of land. I guess I should back up and tell you how my family and I got to naming our house.
It all started with ticks, yes ticks. We got a couple chickens to eat the ticks and it all took off from there. I fell in love with my chickens. They were supposed to live in the yard and eat the ticks end of story. We now have 22 chickens, 4 guineas, 4 ducks and soon to be 3 alpacas. Obviously this was not the end of the story. So that brings me to the farm name. I decided with all of this going on we needed a name for our little mini farm. I introduce to you Yankee Belle Farm. I will keep you updated about all of our farming adventures, and now I feel like we are official because of our awesome sign.
Subscribe to:
Posts (Atom)